

Introduction
Expand card project is a web based project. This tutorial deals with creating card view using flex box.
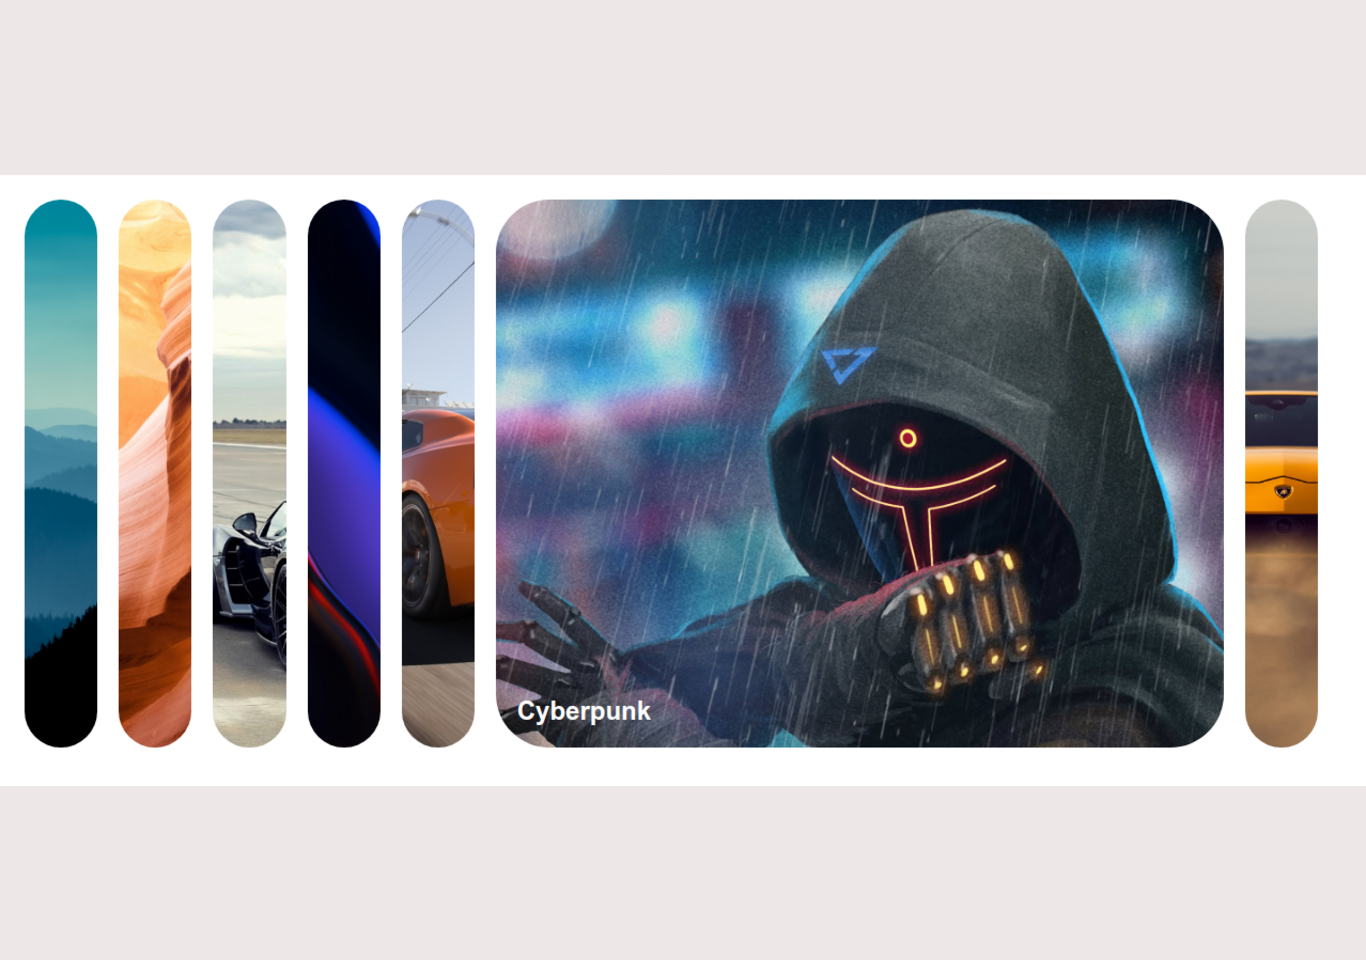
This expand card project is coded in HTML5, CSS, and JavaScript. Both frontend and backend is used in this project tutorial. In this tutorial we will be building expanding cards using flex box. First, we need to create a folder with images folder and files. We will use background images and add a styling effect. These images will be aligned using flexbox. And some text will be added to each image. There will be some images on the screen. When you click on the images it will expand and enlarge itself with animation and CSS transition effect. See the screenshot below.

Expand cards html
Html will be used for placing the image on screen. We will be using google fonts. Check the code below.
index.html
<!DOCTYPE html>
<html lang="en">
<head>
    <meta charset="UTF-8">
    <meta http-equiv="X-UA-Compatible" content="IE=edge">
    <meta name="viewport" content="width=device-width, initial-scale=1.0">
    <link rel="stylesheet" href="style.css">
    <title>Expanding card</title>
</head>
<body>
    <div class="container">
        <div class="panel active" style="background-image: url(images/1.jpg);">
        <h3>Blue Mountains</h3>
        </div>

        <div class="panel" style="background-image: url(images/2.jpg);">
            <h3>Explore the world</h3>
            </div>

        <div class="panel" style="background-image: url(images/3.jpg);">
            <h3>Henessey Venom</h3>
        </div>

        <div class="panel" style="background-image: url(images/4.png);">
            <h3>Wide Wallpapers</h3>
        </div>

        <div class="panel" style="background-image: url(images/5.jpg);">
            <h3>Nissan GTR</h3>
        </div>

        <div class="panel" style="background-image: url(images/6.jpg);">
            <h3>Cyberpunk</h3>
        </div>

        <div class="panel" style="background-image: url(images/7.jpg);">
            <h3>Lamborghini Urus</h3>
        </div>
    </div>
    <script src="script.js"></script>
</body>
</html>
Expand cards css
We will be using CSS for styling image and headings. Check the css code for placing images and text. The code below is used for styling the content and this is how the css is used.
style.css
@import url('https://fonts.googleapis.com/css?Muli&display=swap');

* {
    box-sizing: border-box;
}

body {
    font-family: 'Muli', sans-serif;
    display: flex;
    align-items: center;
    justify-content: center;
    height: 100vh;
    overflow: hidden;
    margin: 0;
}

.container {
    display: flex;
    width: 90vw;

}
.panel {
    background-size: auto 100%;
    background-position: center;
    background-repeat: no-repeat;
    height: 80vh;
    border-radius: 50px;
    color: #fff;
    cursor: pointer;
    flex: 0.5;
    margin: 10px;
    position: relative;
    transition: flex 0.7s ease-in;
}

.panel h3 {
    font-size: 24px;
    position: absolute;
    bottom: 20px;
    left: 20px;
    margin: 0;
    opacity: 0;
}

.panel.active {
    flex: 5;
}

.panel.active h3 {
    opacity: 1;
    transition: opacity 0.3s ease-in 0.4s;

}
@media(max-width: 480px) {
    .container {
        width: 100vw;
    }

    .panel:nth-of-type(4),
    .panel:nth-of-type(5) {
        display: none;
    }
}
Expand card

Expand card js
The javascript will be used for adding a click event listener on the image. This project is responsive from small to large devices. The first image is active and the other needs to be clicked. When clicked the image will float from left to right or right to left. Check the js code below.
script.js
const panels = document.querySelectorAll('.panel')

panels.forEach(panel => {
    panel.addEventListener('click', () => {
        removeActiveClasses()
        panel.classList.add('active')
    })
})

function removeActiveClasses() {
    panels.forEach(panel => {
        panel.classList.remove('active')
    })
}
All the source code is provided in this tutorial. You can click the button below to get the full source code of this project.